Last updated on October 23rd, 2024 at 04:13 pm
In Excel, adding months to date is a common task for various data analysis and financial modeling scenarios. Understanding how to perform this calculation accurately and efficiently can greatly enhance your Excel skills. In this comprehensive guide, we will delve into the intricacies of adding months to a date in Excel. Through clear explanations and practical examples, we will cover the necessary formulas, techniques, and considerations to ensure precise date calculations. Whether you’re a beginner or an experienced Excel user, this article will equip you with the knowledge and tools to confidently handle date calculations involving adding months in Excel.
Understanding Date Serial Numbers in Excel
To comprehend how Excel handles dates, it’s essential to understand date serial numbers. We’ll explore how Excel internally represents dates as numeric values, enabling date calculations. Additionally, we’ll cover the significance of the base date in Excel and its impact on adding and manipulating dates using formulas
How to make Excel add months to date using Edate function
In Microsoft Excel, you can add a number of months to a date using the EDATE function. The EDATE function is categorized under the DATE/TIME function. The function helps add a specified number of months to a date and returns the result as a serial date. This is helpful for financial analysts to calculate maturity dates for accounts payable. The EDATE function also helps in calculating summary by month.
Using the EDATE Function for Adding Months
- Syntax:
EDATE( start_date, months)
- Parameters:
- start_date – The starting date to use in the calculation
- months – The number of months to be added to start_date. It can be either a positive or negative number.
- Returns:
The EDATE function returns a serial date value. A serial date is how Excel stores data internally and it represents the number of days since January 1, 1900.
If start_date is not a valid date, the EDATE function will return the #VALUE! error.
- Applies to:
Excel for Office 365, Excel 2019, Excel 2016, Excel 2013, Excel 2011 for Mac, Excel 2010, Excel 2007.
Edate function in excel Example
Let’s look at some Excel EDATE function examples and explore how to use the EDATE function as a worksheet function in Microsoft Excel:
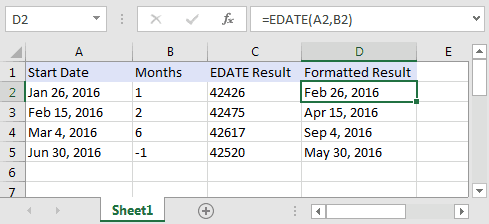
The result of the EDATE function is a serial date and can be seen in column C above. In order to see the formatted date instead of a serial date, you need to format the cells to mmm, d, yyyy.
Handling Edge Cases and Rounding Issues
While adding months to a date seems straightforward, certain edge cases and rounding issues can arise. We’ll address scenarios such as leap years, end-of-month calculations, and handling fractions of a month. By exploring potential pitfalls and providing practical solutions, you’ll be able to handle these intricacies with precision and accuracy.
Adjusting for Workdays or Business Days
In many scenarios, adding months to a date requires considering only workdays or business days. We’ll explore how to incorporate Excel’s WORKDAY and NETWORKDAYS functions to exclude weekends and holidays from the calculation. You’ll learn to adjust your date calculations to align with your specific business requirements.
Incorporating Conditional Logic and Dynamic Calculations
Excel’s versatility lies in its ability to incorporate conditional logic and dynamic calculations. We’ll explore techniques such as utilizing IF statements and nested functions to add flexibility to your date calculations. This includes scenarios where you may need to adjust the added months based on certain conditions or dynamically update the calculations based on changing criteria.
Edate Function in Excel Exampels
Example 1: Suppose you have a start date in cell A1, and you want to add 6 months to that date. In cell B1, you can use the EDATE function to achieve this: =EDATE(A1, 6). The result will be the date that is 6 months ahead of the start date.
Example 2: Let’s say you have a list of payment due dates in column A, and you want to calculate the payment dates that are 3 months later. In cell B2, you can use the formula =EDATE(A2, 3) to add 3 months to the date in cell A2. Copy the formula down the column to apply it to the entire range of payment due dates.
Example 3: If you want to add months to the current date, you can use the TODAY function combined with the EDATE function. For instance, in cell A1, you can enter =TODAY() to get the current date. In cell B1, use the formula =EDATE(A1, 4) to add 4 months to the current date.
Example 4: You may encounter scenarios where you need to add months while considering workdays only. In such cases, you can utilize the WORKDAY.INTL function. For instance, if you have a start date in cell A1 and you want to add 3 work months to it, you can use the formula =WORKDAY.INTL(A1, 3 * 22, 1) assuming a 5-day workweek (22 workdays per month).
Example 5: To handle rounding issues when adding months, you can use the EOMONTH function in combination with the EDATE function. For instance, if you want to add 2 months to a date in cell A1 and ensure that the result falls on the last day of the month, you can use the formula =EOMONTH(EDATE(A1, 2), 0).
These examples demonstrate the practical application of adding months to dates in Excel using various functions and considerations. Experiment with these formulas to suit your specific requirements and expand your understanding of date calculations in Excel.
Conclusion
Congratulations! You’ve now gained a comprehensive understanding of adding months to a date in Excel. By mastering the techniques and formulas covered in this article, you can confidently handle various date calculations in your Excel workbooks. Remember to utilize the EDATE function for straightforward month addition, handle edge cases and rounding issues with precision, adjust for workdays or business days when necessary, and leverage conditional logic for dynamic calculations. Excel’s flexibility and power make it an invaluable tool for handling date-related tasks, and with your newfound knowledge, you’ll excel in performing accurate and efficient date calculations in Excel.
Related
A CFA charterholder with hands-on experience across investment analysis and finance education. At MentorMeCareers, he writes and reviews content on CFA, financial modeling, and investment banking careers — grounded in real market data rather than generic advice, and shaped by what actually helps candidates and professionals succeed.